
A Definitive Guide to Create WordPress Membership Site in 2020
Each of us has different purposes when it comes to building a website. Some want to build a strong online presence, some want to drive leads and revenues, and some want to make it as a passive income source.
However, for the past few decades, we have been relying solely on affiliate and advertising revenue to monetize the website. This is quite a known and common term for all of us. Isn’t it?
But there is another method to make money online. And that is called a WordPress membership site that allows your users to access premium features, content to access the community.
Making a membership site isn’t that easy as it may look on the first site. You have to have some features to manage your users, payments, and memberships.
So, how do you do this?
Don’t think too much, we’re here to guide you through the process of building a membership website. So, let’s get started,
WordPress Membership Site Setup Prerequisites
There are some prerequisites that you need to be aware of to get started with your WordPress membership site, as follow:
- Website domain to get started with your online journey.
- Website hosting account to make your site live.
- Membership add-on to convert your existing website to a membership site.
Once you have these things with you, you’re all set to head over to the next step that is choosing a WordPress platform.
Build a Membership (Subscription) Website in 2020: Easy Steps
From here your journey towards building a membership website starts so we’ll be talking about the process in a step-by-step manner.
- Choosing a WordPress Platform
- Choosing The Best WordPress Membership Plugin
- Getting Started With Your WordPress Membership Website Setup
- Adding Payment Method To Your WordPress Membership Site
- Creating Membership Levels
- Limiting The Resources In the Membership Plan
- Adding Content For Your Member
- Creating a Pricing Page
- Adding User Login Forms
- Finalizing the Membership Email Template
Are you intrigued? Let’s discuss the steps in detail…
 Choosing a WordPress Platform
Now if you are not aware that WordPress has two of its types, WordPress.com and WordPress.org. To get started with your membership website, we recommend you to choose the WordPress.org version as it’s a self-hosted platform. Along with this, you’ll need to make sure you have the best WordPress hosting account, SSL certificate, and domain name.
Once you have all these, the next step follows by installing the WordPress platform. It’s a simple and easy process that you can easily conduct in no time.
 Choosing The Best WordPress Membership Plugin
With the use of a WordPress membership plugin, the process of building a membership website has become quite an easy task. Even WordPress plugins make most of our WordPress tasks easy by allowing us to use all the modern features.
There are a couple of these plugins that made their entries to the list of the best WordPress membership plugins of all time.
In order to choose the best one, you have to have a clear purpose for building a WordPress membership site. For example, if you want your user to register through your site, then WPForms gives you all the required features.
The same goes when you want to sell online courses, in this case, WordPress LMS plugins provide you with all the features to get started. There are other plugins as well that can help you build a perfect WordPress membership site. All you have to remember is your purpose to create a membership site.
 Getting Started With Your WordPress Membership Website Setup
In order to show you the demo process, we’re using the MemberPress plugin as it has all the required features to get started with a membership website. The first thing is the installation and activation process. You can easily install it whether you have experience or not.
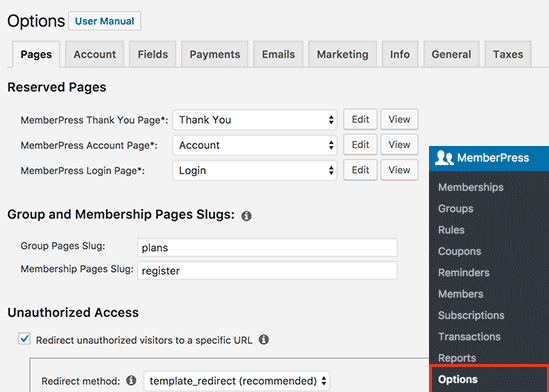
Upon activation, head over to the options page to configure the setting. The page will look like this,
 Adding Payment Method To Your WordPress Membership Site
You can easily view from the above image there is a tab named Payments. The process starts with setting up a payment gateway because that is how you will be accepting payments for your membership site. Note follow the process to get started with your payment gateway setup.
Select the payment tab, the page will open like this,

MemberPress supports PayPal, authorize.net, and stripe methods. The one you want to set up, you need to add credentials for that one.
You can add multiple payment methods in this section. All you need to do is to click the “add another payment method” and make sure you select the update options button in order to save the settings.
 Creating Membership Levels
The next step is to add the membership levels so that your users can purchase. Each level can have different pricing plans, benefits, and limitations. Also, you can add a free membership plan in order to trigger an interest in your audience.
In order to complete this step, head over to the MemberPress dashboard >> membership page and click on “add new”. The page will appear like this,

Now on the next page, you have to enter the title for the membership plan and details of it. And then you have to set the pricing and expiration for this plan under the terms section. This will look something like this,

Once you’re done with this section, scroll down to the page and check the membership options meta box. Here you can customize other things like permissions, membership options, etc.
 Limiting The Resources In the Membership Plan
The next step of your WordPress membership site setup is to limit the resources as per the membership plan. You won’t be allowing your user to access the premium plan when he or she is under a standards plan, right? So, how will you limit this?
Follow the simple process,
Head over to the MemberPress >> Rules page and click on the “add new” section. The page will appear like this,

Now in this section, you can add new rules and restrict others from viewing particular content. For example, you can select the content that needs to be opened for silver subscription members.
Let us show you the page so that it becomes clear to you,
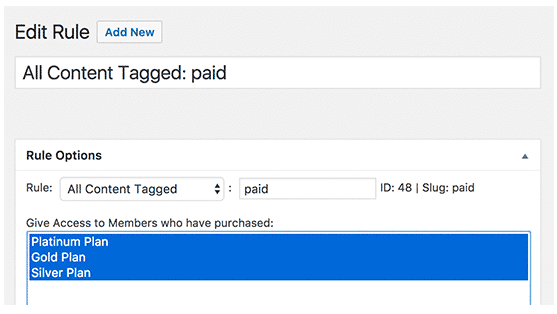
MemberPress allows users to create more specific rules sot that you can even create a single page or URL to let your users access.
From this section, you can add content drip where users can release the content one by one. It’s more like a course that allows your user to complete a certain phase to unlock the next. So, you can set this up in this process so you don’t have to give away all your content once.
Once you’re done with all this click on the “save rule” button and head over to the next phase.
 Adding Content For Your Member
Now the next phase that comes along is to add content for your members. It’s an easy peasy task, especially when you’re using a WordPress membership plugin.
In this section, all you need to do is to add a paid tag to it after creating paid content.
The page will open up like this,
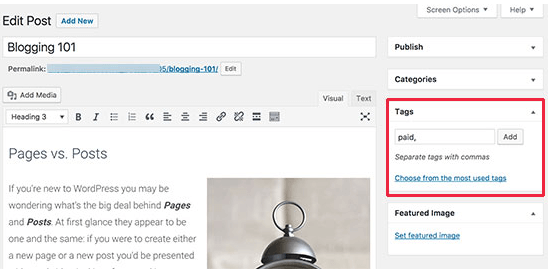
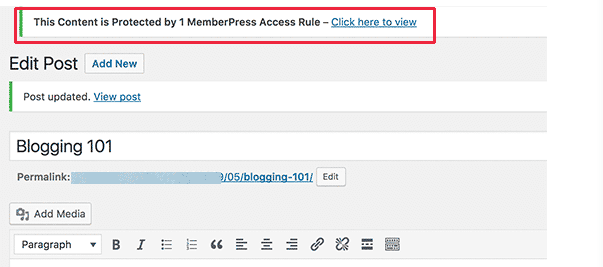
Also, you can make a certain portion of the text accessible and the rest paid. This creates an interest in users and they pay to get access to the site. Once you are done with this process, only members can access the page.
The page will then look like this,
 Creating a Pricing Page
The pricing page is where your users will sign up to access a membership plan. On this page, users will mostly see the plants and will be directed to the payment page once they want to buy a membership.
To add this page, head over to the MemberPress page >> Groups> > add new.

Now enter the title and details and scroll down to the group option meta box where you can add memberships that you want to show it on your page.
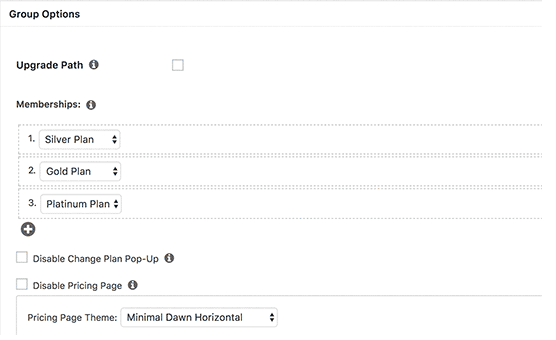
Once you’re done, select the publish button before leaving the site.
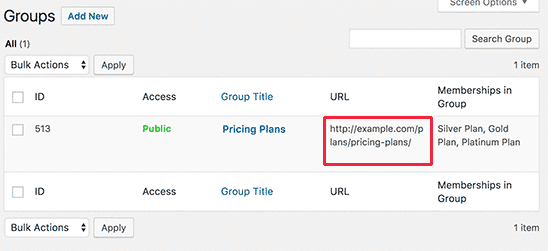
Now that you have your pricing page ready, the next step is to redirect visitors to the pricing payment page. So to do that, head over to the
MemberPress >> Groups and then copy the URL next to the previous group you created.
The page will be like this,
Once you copied the URL, head over to the MemberPress >> Options page and scroll down until you see the unauthorized access section.
The page will open up like this, you need to checkmark the redirect unauthorized visitors to a specific URL option and paste the URL you copied.

Once you’re done with the process, click on the “update options” button and your settings will be saved.
 Adding User Login Forms
Once your membership plan, pricing, and content are set up, the next step is to allow your users to find the way towards the membership.
For this, you need to follow a simple step, head over to the appearance >> widgets >> Memberpress login widget.
The page will open up like this,

Now add the pricing page URL to the navigation menu.
 Finalizing the Membership Email Template
MemberPress allows users to customize the email notifications that the users will receive after subscribing to your membership plan. To do this follow the steps,
Head over to MemberPress >> options page and click on the emails. The page will open up like this,

In order to edit the email notification, click on the edit button and you can include the things that you want.
Once you’re done, make sure you click the “send test” button to save the options.
Conclusion
Creating a WordPress membership website might not look an easy task at first but once you follow the right process, it becomes quite easy. You can also view reports of your membership website to understand how you’re growing on this website. For this, you can head over the report page from the plugin dashboard and download monthly, yearly, or all-time data.
It will be easier for you in this process to understand the performance of your site. You can also use Google Analytics to understand the website better. But make sure you have chosen a perfect membership plugin before you get started with the website as this plays a crucial role in this. We have used MemberPress and it is undoubtedly one of the best. But you can choose any other plugin that suits your purpose.
If this guide has helped you to create a WordPress membership site, then let us know in the comment section. We would love to know about your experiences.