How To Build A WordPress Website: Step-by-Step Guide For Beginners
In today’s world where digital platforms are booming in the market, every brand is spending a significant amount of their marketing budget to increase their online visibility. After all, the online market is huge.
If you want to make your brand instantly grab the attention of your target group of customers, it’s important to appear digitally. This means you should have a solid presence in the digital world. But it takes quite a long time to make such a rock-solid presence in the online world. Meanwhile, you shouldn’t ignore the basics, that is your brand’s website.
Without having a website, dreaming of increasing brand awareness and building brand reputation is like building a castle in the air.
A website represents the way your brand is presented online. It provides all the necessary information including the services that you render, the pricing and plans, the location from where you’re operating, the contact details, the company’s mission and goals, and whatnot.
So, what will you do to set up a website?
Well, it might sound a little daunting to hear that you’ll have to build a website from the scratch. You may think of all the scary coding’s and technicalities while thinking about making a website. But, guess what!! You don’t need to know a single coding when you make a WordPress site.
How cool is that?
Yes, this is the reason why millions of websites in today’s world are powered by WordPress. It’s one of the trusted choices among the developers. But, do you need to be a developer to make a website?
Well, not really if you thoroughly follow this guide. This guide covers every bit of information related to making a website. Once you end reading it and following all the steps, you’ll have your site all set to be live in front of you. Cool?
Okay, so let’s get started. But, before we begin, you may have the following doubts,
- Why would you try to make a website?
- Why do you need a website?
It’s important to clear all these doubts before we begin to foster the process faster. Because if you’re caught up with your doubts, you’ll not be able to follow the process properly.
So, answering the first doubt which is why would you try to make your own site? Well, to put it simply, you can save a ton of money by making a site on your own. Although, WPlearningspot’s experts are always there for you if you’re facing any issue while making your first website. But, we hope this guide will help you to go through the exciting journey of making a website on your own.
Now, if you’re wondering why you need a website, then the reason can be innumerable. But to put it simply, a website will help you stay ahead of your competition. You can increase the chances of getting visible by your target customer’s group. You can showcase the authentication information about your company or yourself through your website. Basically, it represents your face online. Based on this information, people will make certain judgments on your brand or personality. Therefore, you can win some decent chances to win other’s hearts by having a stunning and beautiful website.
Now, we hope all your doubts are cleared and it’s time to head over to the step-by-step process of setting up a website.
Setting Up A Website: The Easiest Way To Create A WordPress Website
Steps to building a website with WordPress is as follows;
- Choose WordPress For Your Website’s Platform
- Buy Domain, Hosting & Pick Your Site’s Name
- Understand The WordPress UI
- Select A Website’s Theme
- Get The Necessary Plugins To Boost Your Site’s Performance
- Create Pages For Your Site
- Create Your Own Blog
- Adjust The Navigation Of The Site
Learn to build a website using WordPress; detailed tutorial –
 Choose WordPress For Your Website’s Platform
As we have told you that WordPress is the most trusted choice among all the developers present in the market. There are other website platforms where you can build your first site. But, it won’t be as easy as setting up a website on WordPress.
Therefore, choose the best content management system, WordPress to make a website. The idea of a content management system is to provide you some easy-to-use tools so that you can edit your site’s content right on the spot without knowing any coding.
The best part of choosing WordPress as your website’s platform is that it allows you to build a perfect website without a single coding. Besides, the interface of WordPress is so user-friendly that users find it similar to Google docs. So, you can create new pages, documents, your site’s content and publish them to the web without knowing enough technicalities.
More than 34% of all the websites all over the world are powered by WordPress. The qualities that make it more special are,
- It’s an open-source platform. It means it’s continuously getting developed by the leaders in the industry.
- It’s versatile. You can run any kind of website on WordPress without facing a single hitch.
- It’s super-fast, well-optimized, and secure.
- It’s SEO friendly which makes your site’s promotion much easier.
- Most importantly, it’s free.
How amazing is that, isn’t it? So, choose WordPress as your website building platform and move on to the next step. There are no actionable tasks in step one. It’s just to make yourself familiarized with the idea of setting up a website.
 Buy Domain, Hosting & Pick Your Site’s Name
Whether you want to make a business website or you want a personal website, the name will imply it. So, there should be an underlying meaning behind each name you choose. If you’re building a website for your business, then it’s best to use your brand name. People will be able to remember your brand with its authenticated name.
It’s actually the fun aspect of the entire process of making up a site. After all, it’s your site and you have the full independence to choose the name.
Ideally, you can pick any name for your site. But, people are often overwhelmed by the choices they have when they think of their first website’s name.
First of all, there are almost 2 billion sites available on the internet which means it can be pretty challenging to keep up your originality.
So, here are a few tips to come up with a decent name for your site,
- Construct the site’s name either with your organization or with the niche where you operate.
- The name should be brandable. It should sound unique so that it can easily stand out in the market
- It should be easy to memorize. Remember, nobody remembers jargon so keep it short, crisp, clear, and concise.
- Include the niche keyword with the name. You can include the name of the location as well.
- Don’t give it a name which is pretty hard to spell and write.
Okay, now we hope you’ve finally got the name for your site, it’s time to buy the domain now. Basically, the domain is the .com, .in, or .org that you see with the company’s name. There’re tools to check the domain availability. You can use a domain wheel to check this. The page will appear like this,
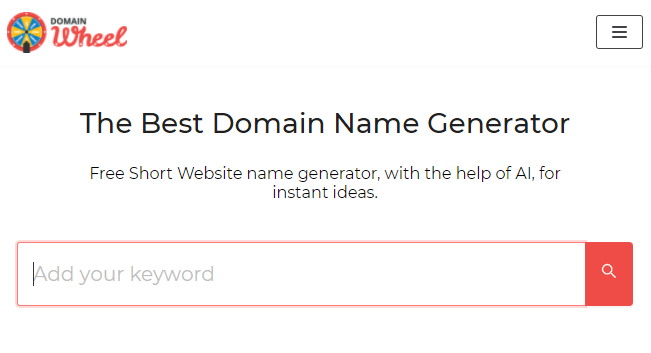 You can put the keyword or the brand name for which you want to buy the domain. It will offer you some suggestions. Depending upon the domain’s availability, you should buy it. So, the next step is to register for a domain and buy a hosting package too.
* Registering Your Domain & Buying the Hosting
Well, it may seem a little daunting to think about registering the domain and buying hosting. But trust us, it’s pretty simple. You can do it right while reading this guide. So, are you excited to jump in?
Let’s get started.
There are hundreds of companies that may help register a domain name and offer you a hosting package, but it’s important to go with the popular and best choices. So, we’ll go with Bluehost.
You may start thinking about why we have chosen Bluehost out of all. So, let’s take a look at the reasons below,
- It’s a reputable web host especially optimized for setting up websites on WordPress. It will make sure your site operates at optimum efficiency.
- It’s recommended by WordPress.org itself.
- It’s cheaper than other web hosting platforms.
- Most importantly, you will get a domain name for free when buying hosting from Bluehost.
So, let’s take a look at the steps how you’re going to buy your hosting plan with Bluehost, follow the step by step process.
- Open bluehost.com. The page will open like this,

- Click on the get started button. You will be directed to the pricing page where you can notice all the plans there. The page will appear like this,
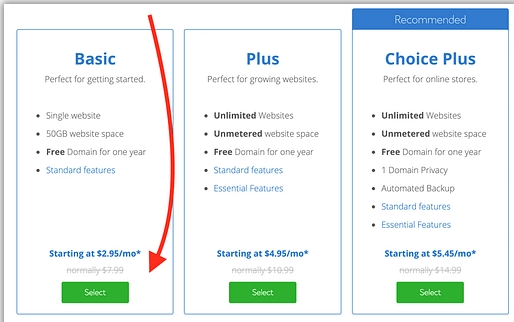
- Now select the basic plan and the next page will open up like this,
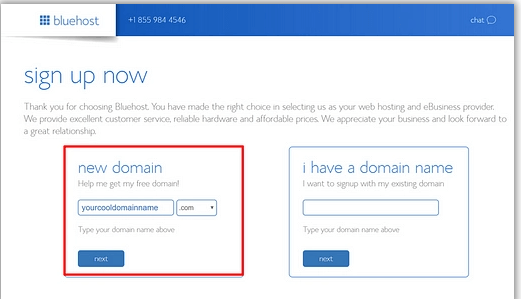
- Okay, now select next from the new domain section. The page will open like this,
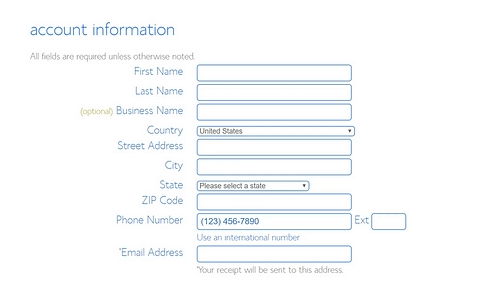
- Check all the parameters before continuing. Check the package information as well from here. The page will look like this,

- Now you’ll get the lowest possible price once you select the 12 months plan. You can now click on the submit and finalize your purchase.
So, you’re now done with buying hosting for your WordPress site. Now, it’s time to install WordPress for the next steps. While you may install WordPress manually too, the Bluehost team will do that for you for no cost. So, why would you miss that chance, right?
As soon as the signup process is completed with Bluehost, you’ll receive an email from the crew with some additional details on your customer profile. Now once you login to Bluehost, it will show you the wizard that will take you to the process of installing WordPress. Once the wizard is completed, your WordPress is installed and you’re ready to move forward with the next steps.
 Understand The WordPress UI
Now that you have your site fully installed and ready, you can log into your WP panel to head over to the dashboard. So, click on www.yourdomain.com/wp-admin/
You will notice a page like the following,
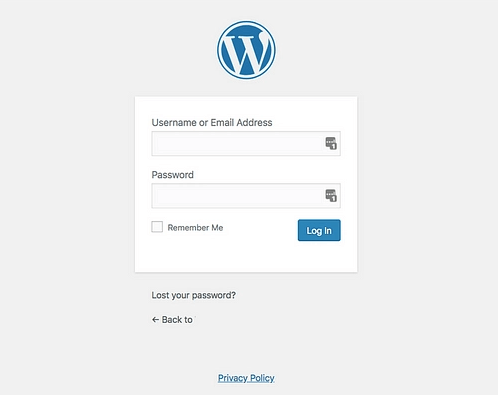
Now type in the credentials and log into the WordPress dashboard successfully. Here, you have a few tasks to do like setting the permalinks, disabling the comments, and so on. We will be discussing each of them one of one. So, let’s get started,
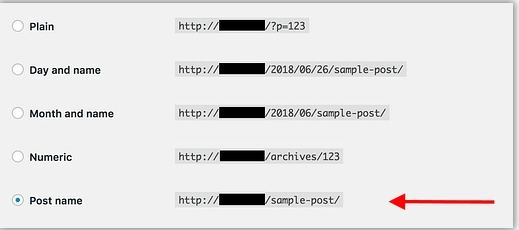
- Setting Permalinks: Permalinks is basically the URL structure of each of your pages within your site. The URLs of each of the pages should be properly optimized to yield the SEO advantages. For example, if you have an “about” page then the link should be optimized like this, yousite.com/about. Setting these permalinks will help you to achieve a range of SEO advantages. To do that, if you have to head over to the settings>permalinks from your WP dashboard and select the setting underneath.
- Make Your Site Public: If you discourage search engines from indexing your site, then there will be no way you can increase your visibility. After all, the ultimate purpose of having a website is to get publicly visible, isn’t it? So, select the setting>reading, and mark the box unticked.

- Set Your Site’s Tagline & Title: The site’s tagline is optional but you shouldn’t be left the title area blank. To do that, you should head over to the settings>general>set the title and the tagline.
- Allow & Disallow Public Comments: Whether you want to accept the comments or not it’s up to one’s own choice. Now select the settings>discussion and select the following,

Note: Remember you should unmark the pingbacks and trackbacks from this setting.
- Select The Time Zone: Well, now it’s time to select your time zone correctly before publishing any pages and posts. Generally, people set the time zone at the places where they’re located or where their target audience is located. For whichever time zone you prefer, you should head over to the settings>general to select the time zone.
 Select A Website’s Theme
Your website should be represented beautifully, isn’t it? The great thing about WordPress is that it works with almost any type of theme. You can make your site using a professional theme or a personal one depending upon the ultimate goal that you have.
Now, the best part is that you can install the popular theme within a few clicks. Now, to get a theme of your own preferences and run the site with it, you have to follow a few steps. So, let’s take a look at the following,
(1) Pick Your Favorite Theme
As we have mentioned that WordPress themes are easy-to-install and you can define the best look of your site through this theme. You can install the theme quickly and customize it as much as you want. The themes don’t change the content, it only changes the site’s presentation.
There is a long list of WordPress themes out there if you check the directory at WordPress.org. You can choose hundreds of themes from there. In fact, you can install a lot of themes for free. And some of them are paid too. But you will get a range of options with these paid themes. You can check the best themes depending upon the goal of your site and head over to the installation phase.
(2) Install Your Theme
To install your theme, you should head over to the official directory of WordPress which is WordPress.org. Then click on the installation button. That’s it. Once you have installed it, head over to the WP dashboard. Now click on the appearance>themes>addnew. Now install a theme that you want for your site. The page will appear like this,
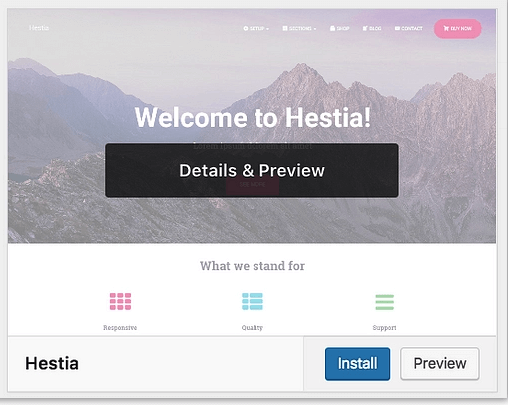
Now click on that install button to fully install it and then click on the activate button that will appear once you’ve successfully installed the theme. Hestia is one of the most preferred themes out of all in the WordPress directory. But, if you want any theme of your own choice, you can follow the same process to make your site loaded with it.
(3) Customize The Theme
Now it’s time to customize the theme. This is one of the best things about WP themes. You can customize it as much as you want. Head over to the appearance>customize. You will notice a page like the following,
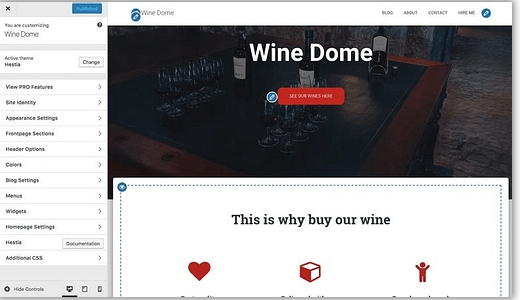
You can customize the homepage setting, add static pages, and do a lot of things from this section.
 Get The WordPress Plugins To Boost Your Site’s
One should get the necessary plugins in order to boost the website’s performance in the long run. It extends the standard functionality of the site and makes it more optimized for better performance. There are a lot of plugins that you can check from the directory. But, we will be discussing some of the plugins that are necessary for your site. So, let’s get started,
- Yoast SEO: The Yoast SEO plugin help to make the site more optimized for SEO performance.
- Google Analytics: This one integrates your site with the traffic analysis solution on the web.
- Wordfence Security: This one improves the site’s security in the long run.
- UpdraftPlus: This one backup all the data of your site without any manual work.
- WpForms: This one adds contact forms on the site and makes your site more friendly for the visitors.
To install any of them, you have to head over to the plugin>add a new section to install and activate any plugin.
 Create Pages For Your Site
Well, your site should have some basic pages like the home page, about us page, contact us page, and so on. So, you have to learn to create some basic pages for your site. To do that, you have to head over to the pages>add a new section and the screen will appear like this,
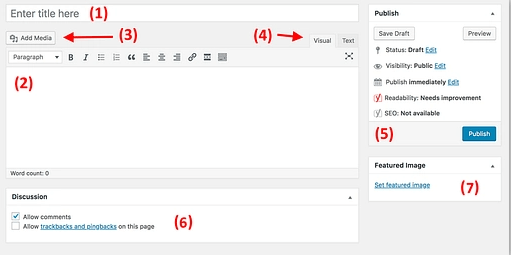
Now to create a page, you have to do the following,
- Type a headline on the page.
- Add a body section that represents what your page is about.
- You can add an image by clicking the add media button.
- Click on the visual or text tab to edit the texts or visual content.
- Click on the publish button once your page is ready to come live.
- You can add a discussion section where others may add a link or comments.
- You can add a featured image from the featured image section.
 Create Your Own Blog
A blog can significantly help you in content marketing in today’s world. In fact, this is the reason why the majority of the website’s owners always prefer creating a site’s blog in order to promote their services or products that they want to sell through their website.
Running a blog is a simple and straightforward process. You have to create some articles and publish the topic on the site. But, the topic must be relevant to the services that you render or the products that you offer.
To publish a blog, it has never been this easy with WordPress. All you have to do is to click on the posts>add new. But, before that, you have to create your page for the blogs. So, you could do that while creating all the pages for your site. Once you have a blog page on the site, you can simply publish content or schedule it for a specific time.
 Adjust The Navigation Of The Site
You should have clear navigation on the site to keep your customers engaged to the site. If people find it too hard to navigate the pages, they will simply leave. After all, the attention span of customers is degrading each day. So, for the navigation menu, you have to check two elements. We will be discussing them one by one,
(1) Menu
Menus are the primary vehicle that your visitors navigate through the site. For that, you have to head over to the appearance>menu from your WordPress dashboard. The panel will appear like this,
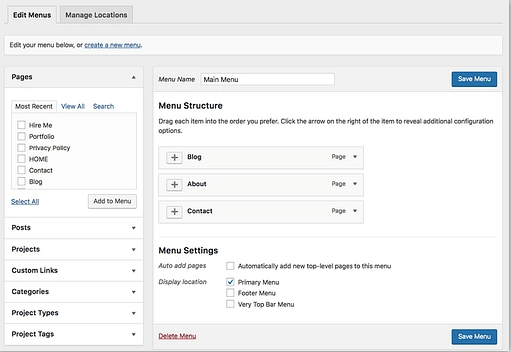
To the left, you can see all the pages that you can choose to add to the menu section, and to the right, you can see the structure of the menu. So, to add a page to the menu, you have to do the following,
- Select about us, contact us, and another one or two pages to add to the menu.
- You can drag these pages and drop them under the menu items and reorder them as necessary.
- When you’re done, you can click on the save menu button to save all the settings.
(2) Widgets
The widget section is an old-school feature in the WordPress site. It’s a small block of content that is displayed in places around the site. To do that, you can click on the appearance> widgets from the WordPress dashboard. The screen will appear like the following,
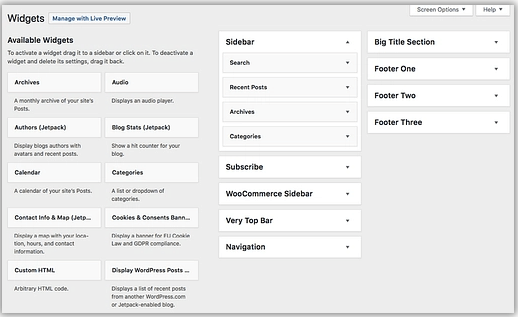
Now you have successfully created your first website and your journey to the digital world begins from now on.
Conclusion
So, you’ve just learned how to build a website using WordPress. How cool was that? Now you have your own site to showcase the latest news or updates about yourself, your company, or the products. You can learn content marketing to promote your site to its best and rank it on the top of Google.
Don’t forget to let us know whether this guide helped you create a site successfully or not. Share your experiences with us.

Thank you, I’ve just been searching for info about this topic for ages and yours is the best I’ve discovered till now. But, what about the bottom line? Are you sure about the source?
Thank you
Thank you